

A smooth finish starts before the paint can opens. Interior wall painting can seem straightforward, but skipping a repair or choosing the wrong roller can leave visible marks, patchy coverage, and untidy edges. The order matters: assess the wall, prepare it for its condition, then apply paint with a steady technique.
Before moving furniture and covering the floors, make a plan for the full job. This guide walks through checking and cleaning walls, repairing small flaws, selecting primer, paint, and tools, and applying a consistent finish. It also explains how to avoid common DIY setbacks.
You’ll learn how to protect trim and floors, cut in cleanly, roll evenly, and check the finish as it dries. If you’re painting a large room, dealing with extensive preparation, or want help with detailed finishing, Virginia Power Washing And Painting Services provides residential and commercial interior painting in Sterling, Ashburn, Herndon, Reston, Leesburg, and nearby Northern Virginia communities.
Key Takeaways
- Assess existing paint, stains, patches, and texture before planning your interior wall painting project.
- Prepare walls in sequence, adapting cleaning and repairs to the surface and product instructions.
- Choose paint finishes and tools based on the room’s use, wall condition, and lighting.
- Use a consistent cutting-in and rolling sequence to support even coverage and neat edges.
- Consider professional help when repairs, access, or finishing details exceed your available time or comfort.
Interior wall painting starts with assessing the room and the surface
Interior wall painting involves more than applying a fresh coat. First assess the wall, then clean and repair it, choose suitable paint, and apply and finish the coating carefully. The inspection helps you decide whether the surface needs cleaning, repairs, primer, or a different approach for its existing paint and texture.
Look across the wall in natural and artificial light. Peeling paint, cracks, nail holes, stains, and glossy patches can affect adhesion and make the finished color look uneven. Textured walls may need more paint to cover grooves, while smooth walls can show roller marks and small repairs more clearly. Existing color matters too: a strong or dark shade may show through a lighter one, so plan for the coverage the change will require.
A preparation plan that matches the wall gives the new paint a more even surface and helps prevent avoidable finish problems.
How to assess a wall before painting
Distinguish ordinary marks from defects that need repair. Scuffs and light grime may call for cleaning; loose paint, open cracks, and dents need attention before coating. Stains can show through fresh paint, and glossy areas may need preparation to help the new paint bond. Cleaning and sanding methods vary by surface, so follow the directions for the products you use.
- Check edges, corners, and areas around switches for peeling paint or cracks.
- Look for stains, patched spots, nail holes, and differences in sheen.
- Test a small, inconspicuous area to check adhesion and see how the color covers.
If a test patch lifts, looks uneven, or does not hide the underlying color, pause before painting the full wall. Reconsider the surface preparation or product choice while the issue is still limited to a small area.
How room conditions shape the painting plan
Room use helps determine the finish. Walls in busy areas or places where hands often touch them may benefit from a surface that is easier to clean, while a quieter room may call for a softer appearance. Consider how daylight shifts across the wall: strong side light can make texture and repairs more noticeable. Existing furnishings and colors also affect how a new shade will look in the space. For a broader design perspective, Wikipedia’s overview of the history and techniques of mural painting shows how walls can contribute to a room’s visual character.
Plan ventilation and drying according to the paint-label directions instead of assuming conditions will be the same in every season. In Sterling, Ashburn, Herndon, Reston, and Leesburg, seasonal weather can affect how readily you ventilate a room. Consider indoor conditions as well as the weather outside. Keep the work area comfortable, follow the label’s drying guidance, and protect the finish from dust and contact while it sets.
Prepare interior walls in the right order before opening the paint
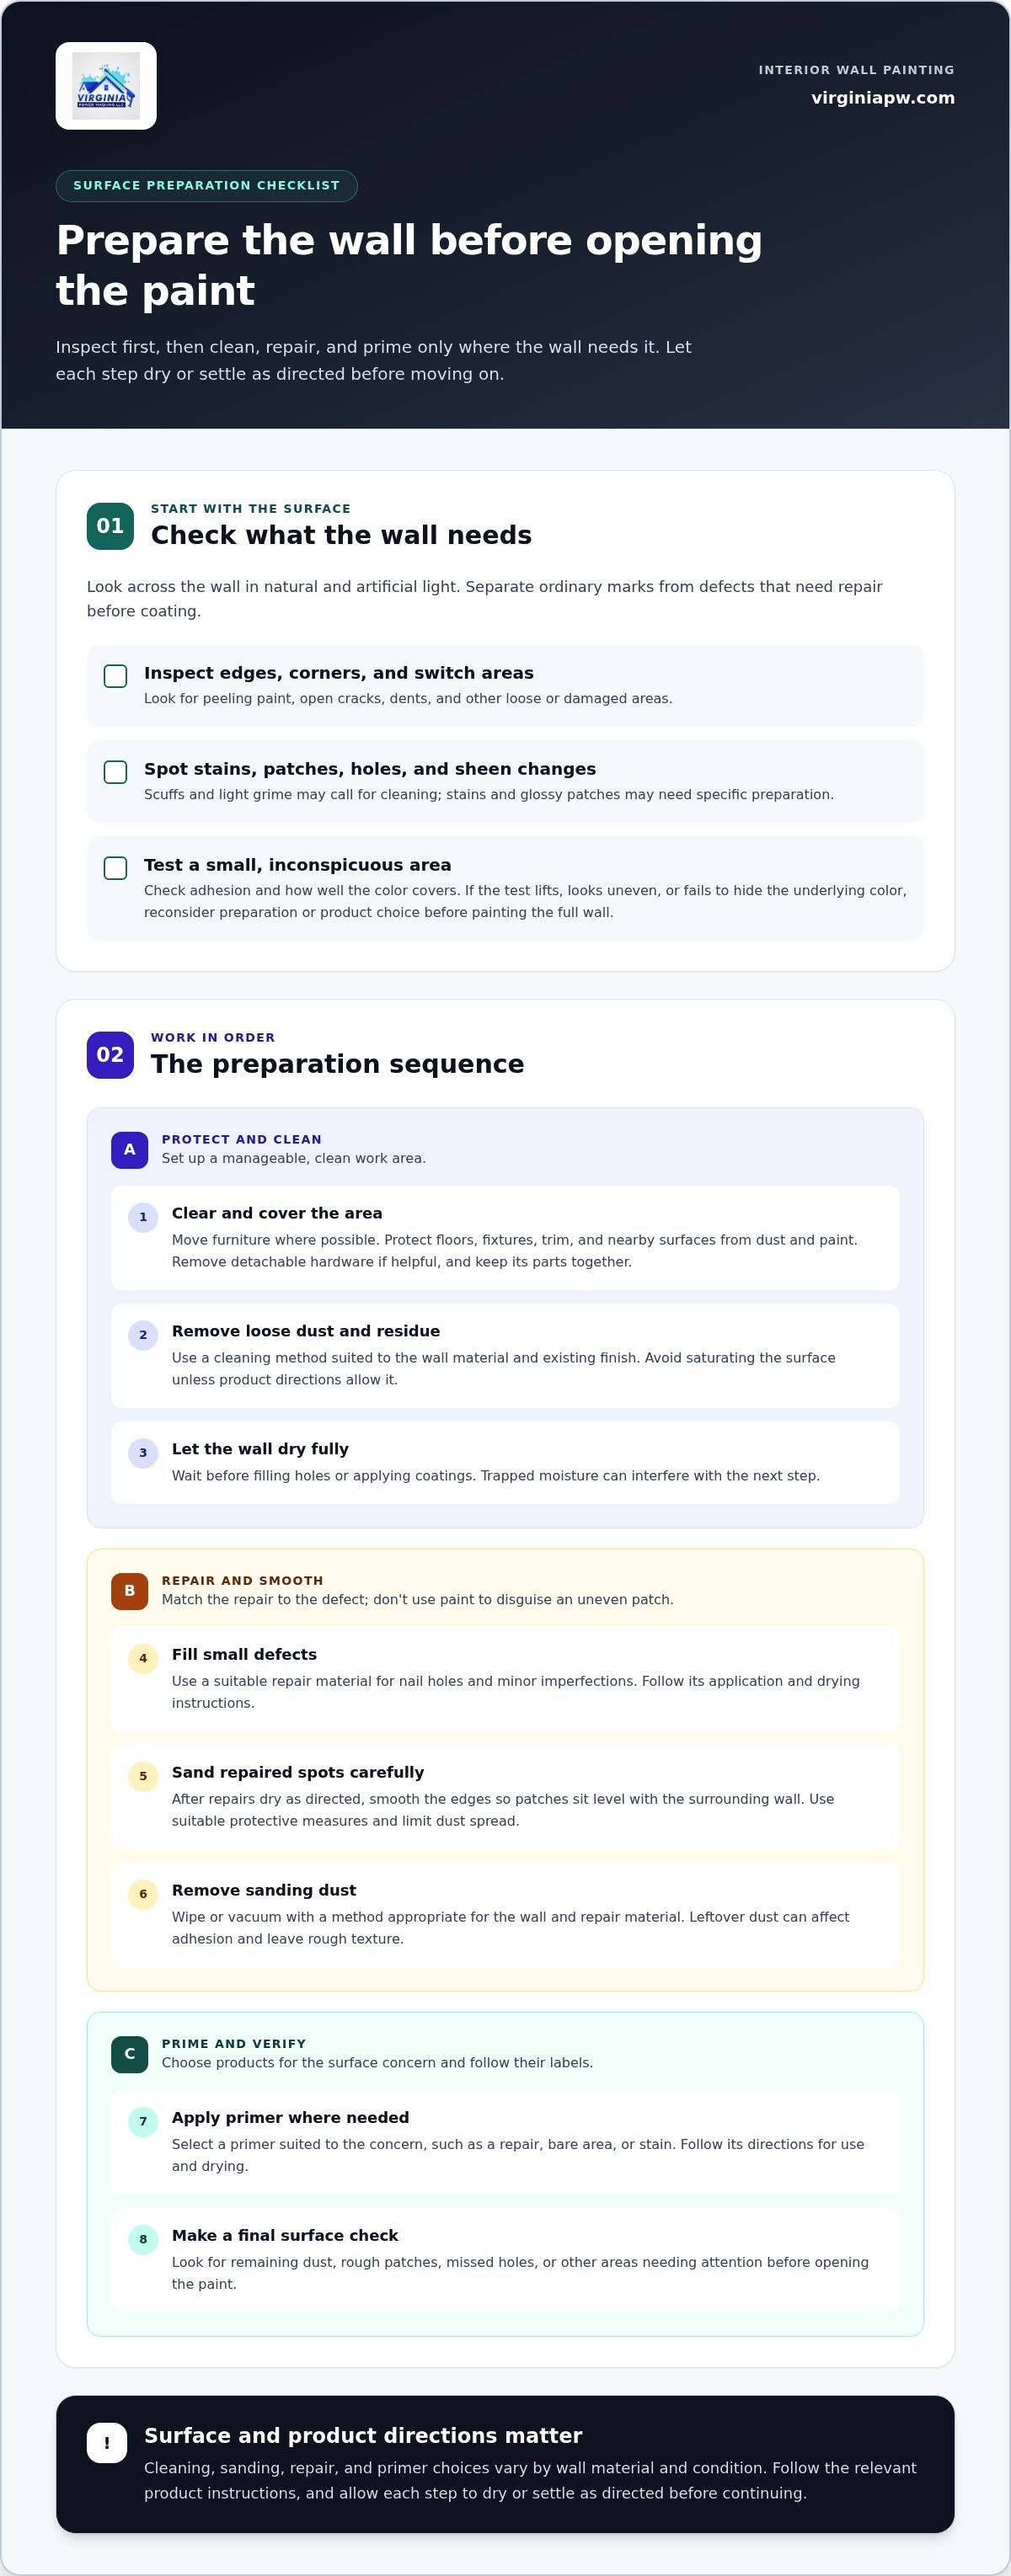
Preparation keeps dirt, loose material, and small surface flaws from showing through the finished coat. Work in sequence, allowing each step to dry or settle as directed before moving on. Cleaning and repair methods vary by wall material and product, so follow the relevant labels rather than using the same method on every surface.
Protect the room and clean the wall
Start by making the work area manageable. Move furniture out where possible, cover anything that remains, and protect floors, fixtures, trim, and nearby surfaces. Removing switch plates and other detachable hardware can help you paint neatly around openings. Keep screws and parts together so they are easy to replace.
- Clear and cover the area. Move furniture, protect the floor, and shield fixtures and adjacent surfaces from dust and paint.
- Remove loose dust and residue. Use a cleaning method suitable for the wall material and existing finish. Avoid saturating the surface unless product directions allow it.
- Let the wall dry. Wait until cleaned areas are fully dry before filling holes or applying coatings. Trapped moisture can interfere with the next step.
- Fill small defects. Apply a suitable repair material to nail holes and minor imperfections, following its instructions for application and drying.
- Sand repaired spots carefully. Smooth the edges so patches sit level with the surrounding wall. Use suitable protective measures and avoid spreading dust through the room.
- Remove sanding dust. Wipe or vacuum using a method appropriate for the wall and repair material. Leftover dust can affect adhesion and create a rough texture.
- Apply primer where needed. Choose a primer suited to the surface concern, such as a repair, bare area, or stain, and follow its label for use and drying.
- Make a final surface check. Look for remaining dust, rough patches, missed holes, or other areas that need attention before opening the paint.
Repair, sand, and prime where needed
Limit repairs to what the wall needs. A shallow nail hole may need only a small amount of filler, while a wider crack or damaged patch may call for a repair product designed for that condition. Let repairs dry as directed, then sand gently until the edges blend into the wall. Clean away residue before coating. Don’t use paint to disguise an uneven patch.
Primer can create a more uniform base when the surface needs it, but the right type and application depend on the wall condition and product directions. Stains, repaired areas, bare surfaces, and the existing finish can each affect the choice. Use the primer and paint instructions together when planning the next step.
Careful preparation takes time, but it can reduce interruptions once painting begins. Virginia Power Washing And Painting Services provides interior painting in Northern Virginia, including Sterling, Ashburn, Herndon, Reston, and Leesburg.
Choose paint, finish, and tools to suit the wall and room
The right materials make interior wall painting easier to control and help the finished surface suit the room. Consider how often the walls need wiping, how much light falls across them, and whether the surface is smooth or textured. Compare finishes and select tools for those conditions rather than relying on one setup for every room.
How to select an interior paint finish
Paint sheen affects both appearance and cleaning. Matte has little shine and can soften the look of minor surface flaws, while eggshell adds a gentle glow. Satin reflects more light and is often easier to wipe. Semi-gloss has a stronger sheen that can make surface irregularities more noticeable. Higher-sheen finishes are often considered for busy areas, but room use and paint directions should guide your choice.
- Matte: A low-sheen appearance that can suit quieter spaces where hiding small wall irregularities matters.
- Eggshell: A modest sheen that balances a soft look with routine cleanability.
- Satin: A smoother, more reflective finish often chosen for rooms where walls need regular wiping.
- Semi-gloss: A noticeably shiny finish that can be useful where frequent cleaning is expected, though it may highlight uneven spots.
Light changes how sheen looks. A wall receiving strong daylight or light from the side may show texture, patches, and roller overlap more clearly, especially with a reflective finish. Look at a sample in the room at different times of day. Check the paint label for suitable surfaces, application instructions, and room-specific guidance.
Which painting tools help create an even coat
A brush gives you control around corners, trim, and other edges, while a roller covers broad wall areas more efficiently. Choose a roller cover with a nap suited to the wall: smoother walls generally call for a shorter nap, while textured surfaces need more pile to reach into the pattern. Compare the cover guidance with the wall texture and paint directions if you’re unsure.
Keep the setup manageable and supplies close by:
- Angled brush for edges and narrow areas
- Roller frame, compatible covers, and a paint tray or grid
- Extension pole for reaching higher sections with steadier control
- Drop cloths or protective coverings for floors and furnishings
- Rags, a small container of clean water or other label-directed cleaner, and a place to set used tools
Choose a roller width you can work with comfortably, and keep a spare cover available in case one is damaged or picks up debris. Before starting, confirm that brushes and roller covers are compatible with the paint, and follow the label for application and cleanup. A well-matched tool helps you keep a steady rhythm without pressing hard to force paint onto the wall.
Paint interior walls with a steady sequence and check your work
A consistent method helps prevent heavy patches, visible roller lines, and uneven edges. Before starting, stir the paint as directed and pour a manageable amount into the tray. Work on one wall at a time, keeping tools and supplies close so you can maintain a steady pace without rushing.
Apply paint from edges to broad wall areas
Begin by cutting in with a brush along corners, ceiling lines, trim, and around fixtures. Keep the painted edge narrow enough to roll the nearby wall while it is still workable. This helps blend brushwork into the rolled surface instead of leaving a distinct border. Avoid loading the brush so heavily that paint runs onto trim or collects in corners.
Use the roller for broad areas, working in sections you can complete without a long pause. Load the cover evenly in the tray, then roll off excess paint so it is coated without dripping. Apply with light, steady pressure. Pressing hard can leave ridges at the roller edges, while rolling with too little paint can create thin, patchy coverage.
- Roll in overlapping passes so each section joins the next without a dry gap.
- Keep a consistent direction and pressure, smoothing heavy edges as you move.
- Reload when the roller begins to lose coverage instead of forcing it across the wall.
- Stop working an area once the paint starts to set, since repeated passes can disturb the finish.
Watch the corners and the edge of each section as you work. A small drip is easier to correct while the paint is wet, using an appropriate brush or roller, than after it dries. If you need to pause, stop at a natural break such as a corner rather than leaving an unfinished area in the middle of a wall.
Dry, recoat, and inspect the finished wall
Follow the paint manufacturer’s directions for drying, recoating, and the number of coats. The product and room conditions can affect the process, so don’t rely on a wait time from another project. Let the surface dry as directed before judging coverage; wet paint can look different from its finished appearance.
Inspect the wall in consistent light from more than one angle. Look for missed patches, drips, uneven edges, thin spots, and paint on trim or fixtures. Use the paint label’s guidance for touch-ups and choose a suitable tool. If the wall needs another coat, follow the specified recoat directions rather than applying it too soon.
Steady technique and careful inspection are central to a tidy interior wall painting result. If the room’s size, access, or finishing details make the work difficult to manage, schedule professional interior painting with Virginia Power Washing And Painting Services.
Know when a DIY wall-painting project may benefit from professional help
A straightforward repaint of a sound wall may fit comfortably into a DIY schedule. The decision changes when the project includes several rooms, extensive surface repairs, hard-to-reach areas, or detailed finishing around built-ins and trim. Consider the full workload, not just rolling: clearing the room, preparing walls, protecting belongings, and allowing for drying all take planning.
When the project scope may call for experienced painters
Consider the size and condition of the space alongside the time you can set aside. Peeling paint, stains, damaged areas, and uneven patches can require more preparation than a simple color change. Multiple rooms mean coordinating materials and work areas, while accent details and precise edges take patience. Professional support is a practical option when the scope feels difficult to complete carefully on your own.
- Wall condition: Widespread peeling, staining, or damage may require more preparation than a quick repaint.
- Room size and access: Large spaces, tall walls, or awkward corners can make consistent application harder to manage.
- Number of areas: Painting several rooms means repeating protection, preparation, application, and cleanup.
- Time and finish expectations: Consider whether you can comfortably allow time for each stage and complete detailed edges to your satisfaction.
These are planning points, not a rule that every project needs a professional. If the wall is in good condition and the work fits your schedule, a careful DIY approach may suit the job. For broader planning considerations, the guide to painting and power washing in Northern Virginia can help you think through the work involved.
Plan a residential interior painting project in Northern Virginia
Virginia Power Washing And Painting Services provides residential and commercial interior painting in Sterling, Ashburn, Herndon, Reston, Leesburg, and nearby Northern Virginia communities. Interior painting includes preparation and application of finishes, with surfaces such as walls, trim, siding, fascia, soffits, and doors. For a room or set of walls that calls for experienced help, professional painting can take the preparation and finishing workload off your hands.
Whether you’re painting one room or planning a larger update, weigh the wall condition, access, project scope, and time available before choosing your approach. Explore interior painting services from Virginia Power Washing And Painting Services.
Set your next painting project up for success
Before gathering supplies, decide how you want the room to feel and how the finished space needs to work day to day. A calm refresh may call for a different color and sheen than a busy family area. Keeping that goal in view helps you make considered choices rather than rushing into a color or finish.
Interior wall painting is also a good opportunity to record the paint color and finish for future touch-ups. Keep those details somewhere easy to find, along with any surface issues you addressed. This gives you a useful reference for later maintenance and helps you work toward a consistent look as the room is used.
If the project feels larger or more detailed than you’d like to manage, professional support can simplify the work. See professional interior painting options and choose an approach that fits your space.
Frequently Asked Questions
Do interior walls need primer before painting?
Not always. Primer is most useful when a wall has bare areas, repairs, stains, or a surface that may not accept paint evenly. A fresh patch, for example, can absorb paint differently from the surrounding wall and stand out after the finish coat. Choose primer based on the surface issue and follow the paint and primer labels. A small test area can help show whether the products work well together.
How many coats of paint do interior walls need?
The number of coats depends on the paint directions, the color change, and how evenly the first coat covers. A subtle shift between similar shades may cover differently from a dark color under a pale one. Let the first coat dry as directed, then inspect the wall in steady light before deciding whether another is needed. Follow the label’s recoat instructions rather than adding a coat before the surface is ready.
Should I paint the walls or trim first?
For most room projects, paint the walls before the trim. Wall paint is quicker to roll and can be cut in along trim edges; small overlaps can then be covered when you paint the trim. Protect finished wall areas as needed, and let paint dry according to its label before applying tape. Tape placed too soon can disturb a fresh coating. Work carefully around corners and keep a damp cloth nearby for accidental marks.
Can I paint over glossy interior walls?
Yes, but don’t assume fresh paint will bond well to a slick surface without preparation. Clean the wall using a suitable method, then follow product directions for preparing glossy paint, which may include light sanding or a compatible primer. Remove sanding dust before coating, and avoid harsh or improvised methods that could damage the surface. Test a small, inconspicuous spot to see whether the new coating adheres and looks even.
How long should interior paint dry before applying another coat?
Use the paint label’s recoat time rather than relying on a universal number. Drying varies with the product and room conditions, so a surface that feels dry may still need more time before recoating. Check the label for drying and recoat guidance, and take extra care in cool, humid, or poorly ventilated conditions. Applying the next coat too early can affect the finish, so follow the manufacturer’s directions.
How do I avoid roller marks when painting walls?
Keep the roller evenly loaded and use light, consistent pressure so it lays down paint instead of pushing ridges to the sides. Work in manageable sections, overlap each pass, and maintain a wet edge as you move across the wall. Don’t keep rolling over paint that has started to set. Check the cover for lint or damage before use, since loose fibers or a worn roller can leave marks in the finish.
Is it better to paint interior walls yourself or hire a painter?
DIY can suit a small room with sound walls when you have time for preparation, careful application, and cleanup. Professional help may make more sense for several rooms, extensive repairs, tall walls, or detailed finishes. Homeowners in Sterling, Ashburn, Herndon, Reston, and Leesburg can weigh the room’s condition and project demands against their schedule. Virginia Power Washing And Painting Services provides residential and commercial interior painting. Contact Virginia Power Washing And Painting Services to plan your interior painting project.


